Tutorial 1: Setting Up Your Python and GitLab for Code and Project Management
Before your first commit reaches a shared repository, three things need to be in place: a reproducible local environment, a protected branch, and a way to track what you’re building. This tutorial sets up all three.
Concepts covered: Python environments, pre-commit hooks, conventional commits, GitLab branch protection, issue tracking, milestones, and burndown charts
Format: Individual or pairs | Duration: 2 hours | Tool: Python, Git, GitLab
Outline
- Part A: Setting Up Your Python Development Environment
- Part B: Setting Up GitLab for Code Management
- Part C: Setting Up GitLab for Project Management
- References
Learning Objectives
By the end of this tutorial, you will be able to:
- Create an isolated Python project with uv and set up pre-commit hooks.
- Write and run a Python script and make well-structured Git commits.
- Configure a protected branch in GitLab and explain why it is necessary for team workflows.
- Write clear software requirements with measurable acceptance criteria in GitLab.
- Create a milestone, break a requirement into work items, and estimate effort using GitLab’s planning tools.
- Read a burndown chart and link a merge request to a work item.
Part A: Setting Up Your Python Development Environment (~60 min)
Prerequisites
- uv (docs.astral.sh/uv) — manages Python, virtual environments, and packages
- Git (git-scm.com)
- VS Code (code.visualstudio.com)
- A GitLab account (gitlab.com or git.infotech.monash.edu for Monash students)
Step 1: Install uv and Create the Project
What Is a Python Package Manager?
When your project depends on third-party libraries — a testing framework, a linter, a web server — you need a way to install them, track which versions you used, and reproduce the same environment on every machine. That is what a package manager does.
Python ships with pip, which installs packages from PyPI. For years it was the default. But pip has a significant limitation: it installs packages into whatever Python environment is currently active, with no built-in project isolation and no deterministic lockfile. Two developers running pip install on the same requirements.txt can end up with different transitive dependency versions, causing bugs that only appear on one machine.
uv solves this. It is a modern Python package and project manager built by Astral (the same team behind ruff). Under the hood it is written in Rust, which makes it 10–100× faster than pip. More importantly, it manages the full lifecycle of a Python project:
| Tool | pip | uv |
|---|---|---|
| Install packages | Yes | Yes |
| Create virtual environments | No (needs venv) | Yes (uv venv) |
| Lockfile for reproducibility | No (manual requirements.txt) | Yes (uv.lock — auto-generated) |
| Manage Python versions | No | Yes (uv python install) |
| Project scaffold | No | Yes (uv init) |
| Speed | Baseline | 10–100× faster |
For a new project in 2025, uv is the recommended starting point. pip remains useful for quick one-off installs, but for any project that needs reproducibility — which is every professional project — uv is the better default.
Install uv:
# macOS/Linux
curl -LsSf https://astral.sh/uv/install.sh | sh
source $HOME/.local/bin/env     # add uv to PATH (or restart terminal)

# Windows (PowerShell)
# powershell -ExecutionPolicy ByPass -c "irm https://astral.sh/uv/install.ps1 | iex"

uv --version                    # e.g. uv 0.6.x
Create the project and activate the virtual environment:
uv init my_project
cd my_project

uv venv                         # creates .venv/
source .venv/bin/activate       # macOS/Linux
# .venv\Scripts\activate        # Windows

python --version                # confirm activation
uv init creates pyproject.toml, a starter hello.py, and .python-version (which pins the Python version for the project). Delete hello.py — you will create your own source files below.
What Is pyproject.toml?
pyproject.toml is the single configuration file for a modern Python project. It replaces the older patchwork of setup.py, setup.cfg, and requirements.txt. Defined in PEP 518 and PEP 621, it is now the standard that all major Python tools — including uv — read from by default.
A freshly created file looks like this:
[project]
name = "my-project"
version = "0.1.0"
description = "Add your description here"
requires-python = ">=3.11"
dependencies = []
As you add dev dependencies in Step 3, uv will append a [dependency-groups.dev] section to this file automatically. By the end of Step 3, pyproject.toml is the authoritative record of what the project is and what it depends on.
Step 2: Initialise a Git Repository
git init
cat > .gitignore << 'EOF'
.venv/
__pycache__/
*.pyc
.env
EOF
git add .gitignore pyproject.toml .python-version
git commit -m "chore: initial project setup with .gitignore and pyproject.toml"
What to commit from
uv init: Commitpyproject.toml(project metadata and dependencies) and.python-version(pins the Python version). Do not commit.venv/. Theuv.lockfile is added after the firstuv addin Step 3 — commit it then.
Step 3: Install Core Development Tools
uv add --dev pre-commit
uv add --dev records the package under [dependency-groups.dev] in pyproject.toml and writes an exact uv.lock lockfile. Anyone who clones the repository and runs uv sync gets an identical environment — no requirements.txt needed.
git add pyproject.toml uv.lock
git commit -m "chore: add pre-commit as dev dependency"
Step 4: Set Up Pre-commit Hooks
Create .pre-commit-config.yaml in the project root with the following content:
# .pre-commit-config.yaml
repos:
  - repo: https://github.com/pre-commit/pre-commit-hooks
    rev: v4.6.0
    hooks:
      - id: trailing-whitespace
      - id: end-of-file-fixer
      - id: check-yaml
      - id: check-added-large-files
uv run pre-commit install
These hooks run on every git commit: they strip trailing whitespace, ensure files end with a newline, validate YAML syntax, and block accidentally staged large files. If a hook modifies a file, the commit is aborted — stage the fix and commit again.
Step 5: Verify the Setup
Create a small module to confirm the environment works end-to-end:
# src/calculator.py
import argparse


def add(a: float, b: float) -> float:
    return a + b


def divide(a: float, b: float) -> float:
    if b == 0:
        raise ValueError("Cannot divide by zero")
    return a / b


def main() -> None:
    parser = argparse.ArgumentParser(description="Simple calculator")
    parser.add_argument("operation", choices=["add", "divide"], help="Operation to perform")
    parser.add_argument("a", type=float, help="First number")
    parser.add_argument("b", type=float, help="Second number")
    args = parser.parse_args()

    if args.operation == "add":
        print(add(args.a, args.b))
    elif args.operation == "divide":
        print(divide(args.a, args.b))


if __name__ == "__main__":
    main()
Run it from the command line:
python src/calculator.py add 3 5       # Output: 8.0
python src/calculator.py divide 10 2   # Output: 5.0
python src/calculator.py divide 1 0    # Raises: ValueError
Step 6: Make Your First Meaningful Commit
With a working script, you are ready to make a proper commit.
Stage only the files you intend to commit:
git add src/calculator.py .pre-commit-config.yaml
Check what is staged before committing:
git status
git diff --staged
Write a descriptive commit message. A good message has a short subject line (under 72 characters) prefixed with a type tag, and a body explaining why — not just what:
git commit -m "feat: add calculator module with add and divide operations

- Implements add() and divide() with type hints
- divide() raises ValueError on division by zero
- CLI entry point via argparse"
Commit Message Type Tags
Prefix every commit subject with a tag that signals the kind of change. This makes the history scannable and is required by tools that auto-generate changelogs.
| Tag | Meaning | Example |
|---|---|---|
feat | A new feature or capability | feat: add divide operation |
fix | A bug fix | fix: handle division by zero in divide() |
chore | Housekeeping — no production code change | chore: update .gitignore |
refactor | Code restructured without changing behaviour | refactor: extract parser into parse_args() |
test | Adding or updating tests | test: add unit tests for calculator |
docs | Documentation only | docs: add usage examples to README |
ci | CI/CD pipeline changes | ci: add pre-commit hook to pipeline |
Why bother? A log full of “fix stuff” and “update” is useless in a code review and impossible to search. Tags cost one word and pay back every time a teammate runs
git log --onelinelooking for when a feature was added or a bug was introduced.
View your commit history:
git log --oneline
Expected output:
a3f92c1 feat: add calculator module with add and divide operations
e1b4d07 chore: initial project setup with .gitignore and pyproject.toml
Step 7: Understand What Not to Commit
| File / Pattern | Why |
|---|---|
.venv/ | Virtual environment — recreatable with uv sync |
__pycache__/, *.pyc | Python bytecode — generated automatically |
.env | API keys and secrets — never commit credentials |
*.egg-info/ | Package build artefacts |
uv.lockshould be committed. It locks every dependency to an exact version, ensuring all teammates and CI reproduce the same environment. Runuv syncafter cloning to restore it.
Verify nothing sensitive is staged:
git status
git diff --staged --name-only
If you accidentally stage a secret, remove it before committing:
git restore --staged .env
Step 8: Activity — Extend and Commit
- Add a
multiply(a, b)function and asubtract(a, b)function tosrc/calculator.py. - Add CLI support for both operations in
main(). - Verify the new operations work from the command line.
- Stage and commit with a meaningful message:
git add src/calculator.py
git commit -m "feat: add multiply and subtract operations to calculator"
- Verify the commit appears in your log:
git log --oneline
Part B: Setting Up GitLab for Code Management (~20 min)
GitLab hosts your repository and enforces team workflows through protected branches — rules that block direct pushes to main and require all changes to go through a reviewed merge request.
Step 1: Understand Protected Branches
What Is a Protected Branch?
When a team collaborates on a shared repository, uncontrolled pushes to the main branch can introduce broken code, overwrite teammates’ work, and bypass code review. A protected branch enforces rules about who can push directly and who must go through a reviewed merge request.
Why protect main?
| Without protection | With protection |
|---|---|
Any developer can push directly to main | Only maintainers (or no one) can push directly |
| No code review required | All changes must go through a merge request |
| CI/CD pipeline can be bypassed | Pipeline must pass before merging |
| Bugs reach production immediately | Reviewers and automated checks act as a gate |
Git history can be rewritten (force push) | History is preserved — the audit trail is intact |
In professional teams, main almost always has branch protection enabled. Feature work happens on short-lived branches; changes reach main only through reviewed, approved merge requests.
Step 2: Set Up a Protected Branch in GitLab
Prerequisites: Maintainer role on the project.
- In your project, navigate to Settings > Repository.
- Scroll to Protected branches and expand the section.
- In the Branch dropdown, select or type
main. - Configure Allowed to push:
- No one — forces all changes through merge requests (recommended for production branches)
- Maintainers — only maintainers can push directly
- Developers + Maintainers — both roles can push directly
- Configure Allowed to merge:
- Maintainers — only maintainers can approve and merge
- Developers + Maintainers — both roles can merge
- Click Protect.
The recommended setting for most student teams is:
| Setting | Value |
|---|---|
| Allowed to push | No one |
| Allowed to merge | Maintainers (or Developers + Maintainers) |
What about force-push? Force-push protection is enabled automatically on protected branches. This prevents anyone from rewriting history — critical for preserving a shared audit trail.
Step 3: Activity — Verify Branch Protection
After protecting main, attempt a direct push to confirm it is blocked:
git checkout main
echo "test" >> README.md
git add README.md
git commit -m "chore: test direct push"
git push origin main
Expected output:
remote: GitLab: You are not allowed to push code to protected branches on this project.
To https://gitlab.com/your-team/your-project.git
 ! [remote rejected] main -> main (pre-receive hook declined)
error: failed to push some refs to 'https://...'
This rejection confirms the protection is working. All changes to main must now go through a merge request.
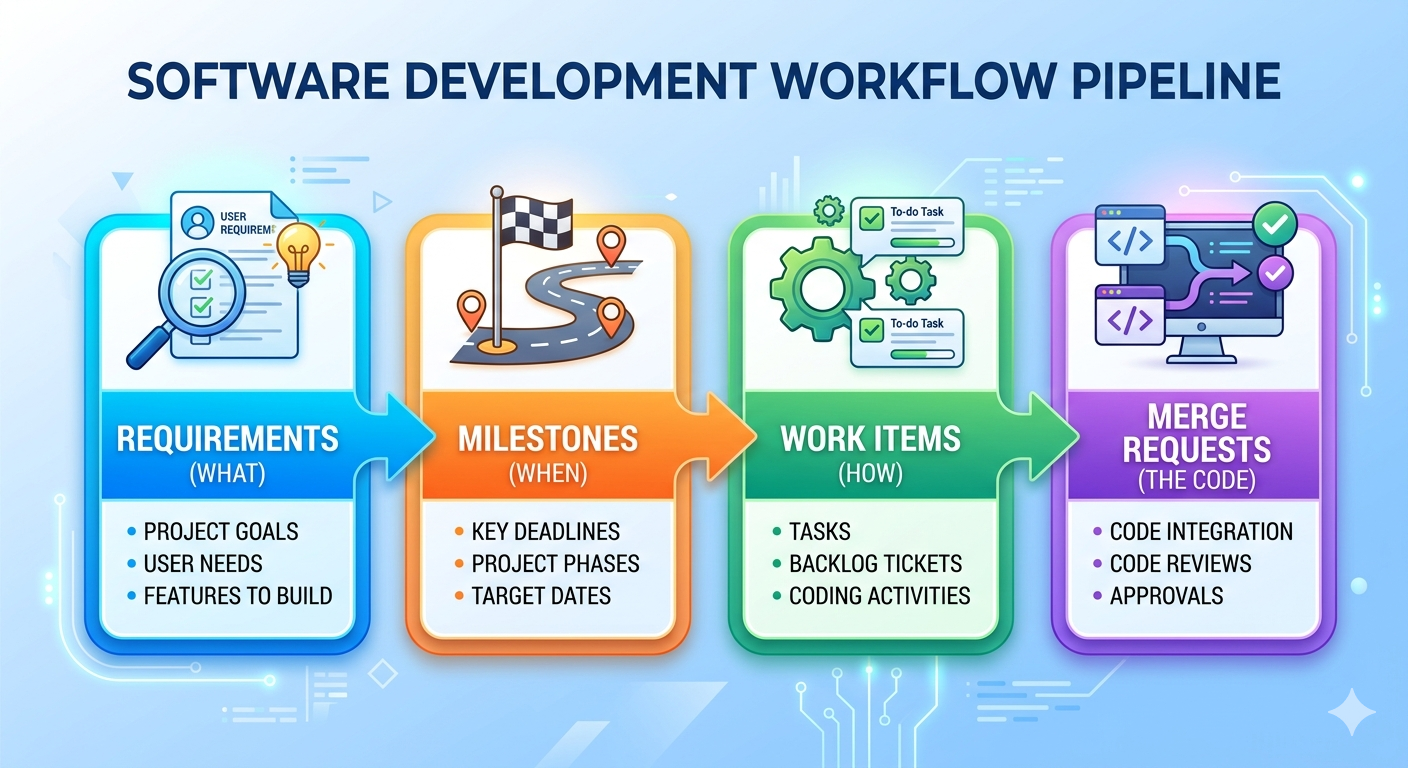
Part C: Setting Up GitLab for Project Management (~40 min)
GitLab provides a built-in planning suite under the Plan menu. The recommended workflow follows a top-down structure:
Step 1: Create a Requirement with Acceptance Criteria
What Is a GitLab Requirement?
A Requirement in GitLab describes a specific behaviour your product must exhibit. Unlike issues, which represent individual tasks, requirements are long-lived artefacts — they persist until manually archived or marked as satisfied. They capture what the system must do, from the perspective of stakeholders and users.
How to Create a Requirement
- In your project, go to Plan > Requirements.
- Click New requirement.
- Enter a Title — a short, one-line statement of what the system must do.
- Enter a Description — include context, rationale, and acceptance criteria (the conditions under which the requirement is considered satisfied).
- Click Create requirement.
Writing Good Requirements
A well-written requirement is:
- Specific — describes a single, unambiguous behaviour
- Testable — you can write a test to verify it is satisfied
- User-focused — describes what the user needs, not how to implement it
- Complete — includes clear acceptance criteria with no gaps
| Example | |
|---|---|
| Bad | “The system should be user-friendly and perform well on the login page.” |
| Good | “As a registered user, I can reset my password by entering my email address and receiving a reset link within 2 minutes.” |
Good requirement with acceptance criteria:
Title: User Password Reset

User Story:
As a registered user, I can reset my password using my email address
so that I can regain access to my account if I forget my credentials.

Acceptance Criteria:
- [ ] A "Forgot password?" link is visible on the login page
- [ ] Submitting a valid registered email sends a reset link within 2 minutes
- [ ] The reset link expires after 24 hours
- [ ] Submitting an unregistered email shows no error (to prevent account enumeration)
- [ ] Clicking the link prompts the user to set a new password
- [ ] The new password must be at least 8 characters long
Step 2: Create a Milestone
A milestone is a time-boxed goal: a sprint, a release, or a project phase. Work items are assigned to milestones, making it possible to aggregate progress and visualise it on a burndown chart.
How to Create a Milestone
- In your project, go to Plan > Milestones.
- Click New milestone.
- Enter a Title — name it after its goal (e.g.,
Sprint 1 – User Authentication). - Optionally add a Description summarising the sprint goal.
- Set a Start date and Due date — these are required for the burndown chart.
- Click New milestone.
Tip: Name milestones by their goal, not just their number.
Sprint 1: User Authenticationis more useful thanSprint 1— especially when reviewing old milestones months later.
| Field | Required? | Purpose |
|---|---|---|
| Title | Yes | Identifies the milestone |
| Start date | Recommended | Sets the left axis of the burndown chart |
| Due date | Recommended | Sets the right axis (target completion) |
| Description | Optional | Sprint goal for the team |
Step 3: Break Down a Requirement into Work Items
Requirements describe what must be built. Work items (issues) describe the individual tasks required to build it. A single requirement typically breaks down into several work items — each small enough to complete in one or two days.
Example breakdown:
Requirement: User Password Reset
    │
    ├── Issue: Design the password reset email template
    ├── Issue: Implement POST /auth/reset-password API endpoint
    ├── Issue: Add "Forgot password?" link to the login page UI
    ├── Issue: Write integration tests for the reset flow
    └── Issue: Apply rate limiting to the reset endpoint (security)
A good breakdown has these properties:
- Each issue has a single, clear deliverable
- Issues are small enough to close within 1–2 days
- Together, closing all issues satisfies the requirement
- Issues reference the parent requirement for traceability
Step 4: Create Work Items and Link to a Milestone
How to Create a Work Item
- In your project, go to Plan > Issues (or use the + button in the top bar).
- Click New issue.
- Enter a Title — a clear, actionable statement of the task.
- Add a Description with relevant implementation details and a “Definition of Done” checklist.
- In the right sidebar, click Milestone and select your sprint milestone.
- Optionally set Labels (e.g.,
backend,frontend,testing), Assignee, and Weight. - Click Create issue.
| Work Item | |
|---|---|
| Bad | "Fix the login stuff" |
| Good | "Implement POST /auth/reset-password API endpoint" |
Good work item:
Title: Implement POST /auth/reset-password API endpoint

Description:
Implement the backend endpoint that handles password reset requests.

Behaviour:
1. Accepts POST with body `{ "email": "user@example.com" }`
2. Looks up user by email (return HTTP 200 regardless to prevent enumeration)
3. Generates a secure, time-limited reset token (expires 24 hours)
4. Sends a reset email via the notification service
5. Stores the token hash in the database (never the raw token)

Definition of Done:
- [ ] Endpoint implemented and unit-tested
- [ ] Integration test confirms email is sent for valid addresses
- [ ] Rate limiting applied (max 5 requests / minute per IP)
- [ ] Code reviewed and merged to `main`

Milestone: Sprint 1 – User Authentication
Labels: backend, security
Step 5: Estimate Time for Each Work Item
GitLab supports time tracking directly on issues. Estimates help the team plan the sprint and contribute to issue weight on the burndown chart.
Adding a Time Estimate
- Open the work item.
- In the right sidebar, locate the Time tracking section.
- Click Edit (pencil icon) next to Estimated time.
- Enter the estimate (e.g.
3h,1d,30m) and press Save.
Logging Actual Time Spent
- Open the work item.
- In the right sidebar, locate the Time tracking section.
- Click Add time entry.
- Enter the time spent (e.g.
1h 30m), optionally select the date, and click Save.
GitLab will display a time tracking widget on the issue showing estimated vs. actual time — useful for retrospectives and future estimation calibration.
Using Issue Weight
Weight is a numeric score representing effort or complexity (similar to story points in Scrum). Set it in the issue sidebar. The burndown chart can display progress by weight rather than by issue count — giving a more accurate picture when some issues are significantly larger than others.
| Weight | Rough meaning |
|---|---|
| 1 | Trivial — a small tweak |
| 2–3 | Small — a few hours of work |
| 5 | Medium — a day or two |
| 8+ | Large — consider splitting this issue |
Step 6: Analyse the Burndown Chart
Once issues are assigned to a milestone with a start and due date, GitLab generates a burndown chart automatically.
Accessing the Charts
- Go to Plan > Milestones.
- Select your milestone.
- Scroll to the burndown chart at the bottom of the milestone page.
Reading the Burndown Chart
The burndown chart plots remaining open issues (or total weight) for each day of the milestone. A dotted ideal line runs straight from the total issue count on Day 1 to zero on the due date.

Illustrated by Gemini
| Actual line vs. ideal | What it means |
|---|---|
| Above the ideal line | Behind schedule — more issues remain than expected |
| On the ideal line | On track |
| Below the ideal line | Ahead of schedule |
| Flat (not decreasing) | No issues are being closed — team may be blocked |
| Sudden drop | Multiple issues closed at once — may signal batching rather than continuous delivery |
| Chart | What it shows | Best for |
|---|---|---|
| Burndown | Remaining work declining toward zero | Tracking sprint completion progress |
| Burnup | Completed work rising; total work as a second line | Identifying scope creep |
The burnup chart is particularly useful when scope changes mid-sprint. If new issues are added to the milestone, the total-work line rises — making the scope increase immediately visible.
For example screenshots of both chart types, see the GitLab Burndown and Burnup Charts documentation.
Step 7: Create a Merge Request for Each Work Item
Once a work item is ready for implementation, create a branch and merge request directly from the issue. This keeps the code, the task, and the review process linked in one place.
How to Create a Merge Request from a Work Item
- Open the issue.
- In the right sidebar, click Create merge request (or the dropdown arrow to set branch options).
- GitLab creates a new branch named after the issue (e.g.,
12-implement-post-auth-reset-password) and a corresponding draft merge request. - Work on the branch locally:
git fetch origin
git checkout 12-implement-post-auth-reset-password

# Make your changes, then:
git add src/auth/reset_password.py tests/test_reset_password.py
git commit -m "feat: implement POST /auth/reset-password endpoint"
git push origin 12-implement-post-auth-reset-password
- When the work is complete, open the merge request on GitLab and mark it Ready (remove the Draft status).
- Assign at least one reviewer.
- The MR is blocked from merging to
mainby the protected branch rule until it is approved.
Closing an Issue via a Merge Request
Add a closing keyword to the MR description to automatically close the linked issue when the MR merges:
Closes #12
When the MR is merged, Issue #12 is automatically closed and the burndown chart updates immediately.
Supported closing keywords: Closes, Fixes, Resolves (case-insensitive).
Step 8: Activity — Link a Merge Request to a Work Item
Using the milestone and issues you created in Steps 2–4:
- Open one of your issues and click Create merge request to generate a branch and draft MR.
- Check out the branch locally and make a small change (e.g., add a comment to a source file):
git fetch origin
git checkout <branch-name>
# make a change, then:
git add <file>
git commit -m "chore: placeholder change for MR activity"
git push origin <branch-name>
- Open the merge request on GitLab and add a closing keyword to the description:
Closes #<issue-number>
- Mark the MR as Ready (remove Draft status) and merge it.
- Navigate back to the issue and confirm it is now closed.
- Open your milestone and verify the burndown chart reflects the closed issue.
References
- uv Documentation — Python package and project manager: installation, virtual environments, and lockfiles
- pre-commit Documentation — Managing and installing pre-commit hooks
- Conventional Commits — Specification for the commit message type tag format (
feat:,fix:,chore:, etc.) - GitLab Protected Branches — Configuring branch protection rules
- GitLab Requirements — Creating and managing long-lived requirements
- GitLab Milestones — Setting up and managing milestones
- GitLab Time Tracking — Estimates, spending, and the time tracking widget
- GitLab Burndown and Burnup Charts — Reading and interpreting progress charts
- GitLab Merge Requests — Creating merge requests and linking them to issues